Visashot, a screenshot python script for vintage instruments | |
|
Download visashot.py 86 instruments supported! 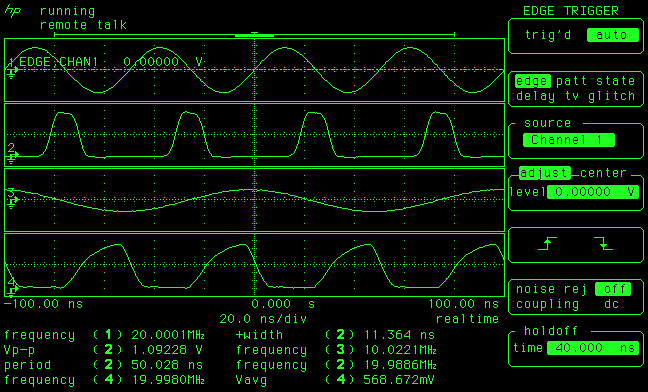 Spoiler alert: CRT-green is awesome Old Hewlett-Packard gear with CRTs or LCDs were not equipped with the now ubiquitous USB memory port to save screenshots. Some later HP models started to have 3.5" floppies, and while it's a great way to pull screenshots out it's still a bit messy: need to source a 3.5" drive and floppies, slow bit rate,... However, many of those instruments will also happily print over parallel, serial or HP-IB. The latter is the weapon of choice here: your vintage lab probably has a few IEEE-488 cables lying around and GPIB remains a great interface for controlling test and measurement gear (fear not, other interfaces are also supported, see below!) Unfortunately the 'print' function was originally meant as a real print-to-printer function, and good luck finding and maintaining an old HP plotter or printer that supports PCL. How cool would it be to be able to capture a screenshot from the instrument directly from your PC? In my book that qualifies as instant nerd creds. But unfortunately (again) there is very little info online on how to do this. Keysight still has a remanent on how to get the data, but the sample programs are in weird old BASIC and not up to date with current programming languages/standards. Plus forget about multi-platform. Time to get our hands dirty! Internal greasy bitsThe interesting bit I gathered from the link above is that the "PRINT?" command (or sometimes "*SYSTEM:PRINT?" command) is what can be used to get the data, at least on my 53310A. IOW, the example shows that you ask the device to print (to a printer) but then somehow get the data yourself through GPIB. Weird? Indeed. In this case the interrogation mark in the command is the key: it means we want an answer, and that answer is just the printing data! (Not adding the "?" would probably print to a printer, but I'm not sure.) Using Python and pyvisa, this simply translates to:
device.write("SYSTEM:PRINT?")
buffer = device.read_raw()
...and that's it! The screenshot data is now in the buffer variable. Given that these older devices were built before PNG and JPEG were invented, there is no standard format and in this case you're likely to get PCL (but other stuff could come out too). In addition, some devices may return bitmap data in PCL, other will return line graphics. How can you convert the PCL buffer to a bitmap or vector graphic file that's usable today? Ghostscript has the ghostpcl tool to output to PDF and other formats and that's a good way to start probing. After saving the python buffer to a file (in binary mode!) we can use ghostpcl to view our first screenshot: ghostpcl -sDEVICE=pdfwrite -sOutputFile=screenshot.pdf buffer.pcl This works fine but there's a few little problems. First the data I get from both my 53310A and 54542A are bitmap screenshots. No need of a PDF for that! An image would be simpler. Secondly the 'plot' appears with seemingly random margins on a much larger 'white' page, ready to be printed in a printer that doesn't exist. That's not very user friendly. It'd be much nicer to get that binary data directly from the PCL data. Can we reverse engineer it? Of course! After a bit of swearing at the hex editor this is how the PCL data buffer is formatted as far as I can tell:
The output from the 54542A is a bit more complicated as it adds the time and date of capture, as well as some parameters like vertical and horizontal scales. But restricting ourselves to the "0x1B 0x2A" bits nicely trims off all that stuff. Also, the 54542A reports a stride (in the header) of 640 but an image row width of 648. The data is indeed 81 bytes long (81*8=648pixels), but the last byte (8 pixels) is blank and not useful. Thus the actual image width can be set to the minimum of the header stride and the row width. Armed with this information we can write a nice python script that parses the PCL data and saves it as a PBM file, a natural choice for 1-bit-per-pixel data. The PBM data can then be processed in any image editor like Gimp or XV. But since we're likely to want to do the same edits over and over, why not include that in our python script? ImageMagick to the rescue, and now the background and foreground colors as well as a surrounding margin can be modified. Plus the output is in a more modern/compressed/universal PNG format. Screenshots galleryHere are some results for a few devices. Dat green CRT look... NOICE.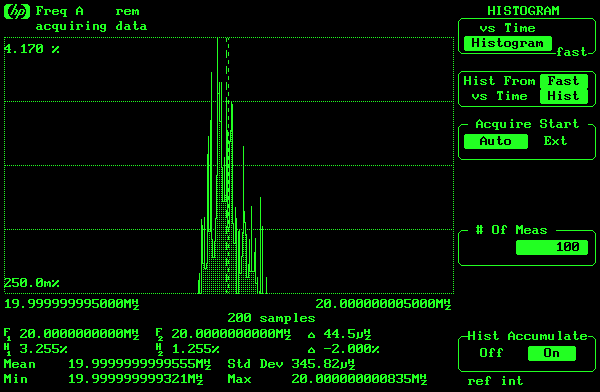 HP-53310A Modulation Domain Analyzer HP-54542A 500MHz 2Gs/s Oscilloscope 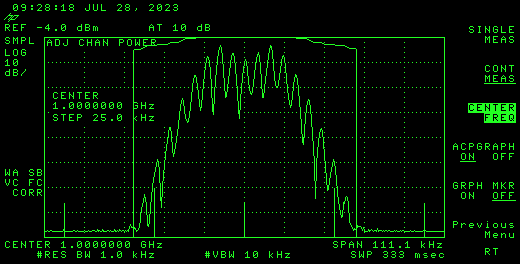 HP-8594A Spectrum analyzer (Thanks Wilko!) Note the slightly squished aspect ratio of the last screenshot. Some CRTs have non-square pixels so the buffer aspect ratio does not match what is seen on the instrument's screen. For 85xx instruments for example it seems the pixels have an aspect ratio of 5:4 (1.25), which is hard to render nicely on a PNG without the image getting blurry in one direction. To solve this problem without adding fuzzyness we can simply upscale the image using an integer factor. This is done manually usint the -p option (command line) or 'scale' argument (python call). 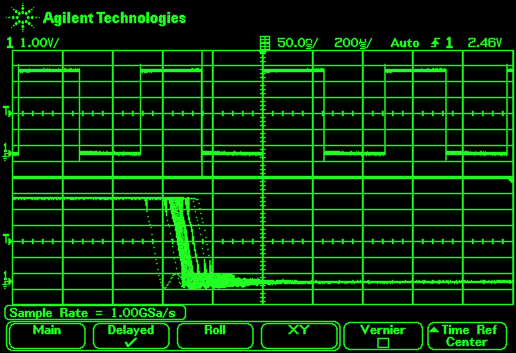 HP-54641D Mixed signal oscilloscope. Note that the scope does not export a grayscale image over HPIB :-( For supported LCD-based devices that follow the architecture of the HP4396B the output is in TIFF format which makes things quite a bit easier. Plus we of course gain color, but the actual resolution is smaller than the older CRT devices because the menu area is sometimes blanked (and thus can be trimmed). A large part of the LCD is also unused due to the LCD being larger than the physical viewport/frame of those devices. In other words a lot of pixels are lost... 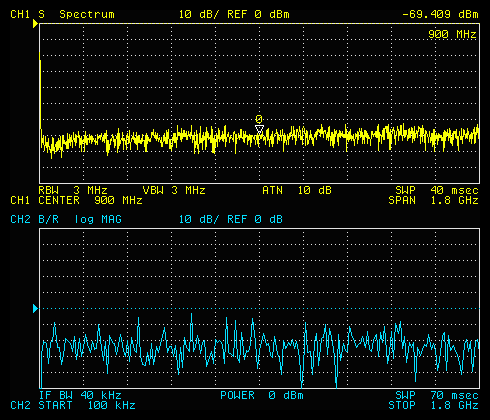 HP-4396B Spectrum/Network/Impedance Analyzer. Menus are often not shown in the TIFF, so auto-trimming to image content was used. 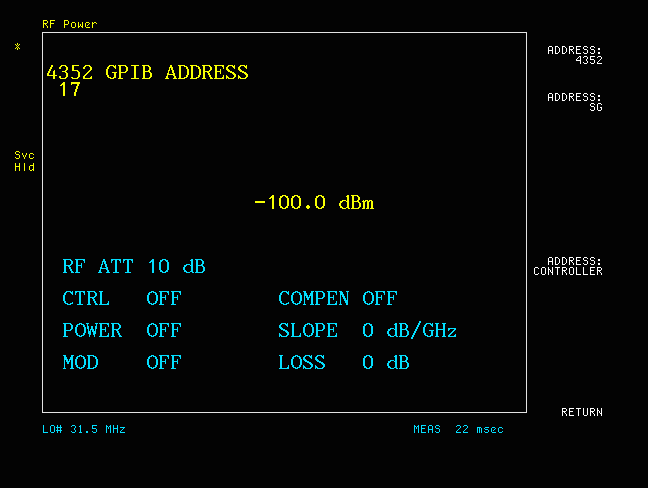 HP-4352B PLL/VCO Signal Analyzer, without any trimming. This shows the amount of unused display area, especially on the right and bottom edges. UsageThe screenshot script is normally invoked from the command line. Use './visashot.py -h' for instructions. A typical use case would be: $> ./visashot.py -d 8 -x xv -o output.png -g where '-d' selects the HP-IB address of the device, '-x' opens the image in the specified program (here 'xv') and '-o' selects the output filename. This filename also lets you choose the image type depending on its extension. Lossless formats like PNG, PPM, TIFF or BMP are strongly recommended. Lossy formats like JPEG will result in poor quality. The last option, '-g' is actually not typical at all, and is used to show debug messages. Useful when something goes wrong! For interfaces other than HP-IB a VISA identifier string can also be used. For example, for a serial device on COM1: $> ./visashot.py -s "ASRL1::INSTR" -o output.png Alternatively, visashot can also be imported and used in your own python code, for example to periodically take a screenshot of an instrument. Here's a typical invocation:
import pyvisa
import visashot
ressourceManager = pyvisa.ResourceManager()
instrument = ressourceManager.open_resource("GPIB0::7::INSTR")
visashot.capture(instrument, "screenshot.png", margin = 10)
Compatible devicesThis screenshot python script currently supports the following devices
In addition, the following devices should work but are untested. If you have any of those please give them try and get in touch.
You can also access the list of these 80+ compatible devices from the command line with the '-C' option: $> ./visashot.py -C If you have an instrument that is not listed and you know which GPIB commands to send to capture a screenshot, please get in touch and we'll figure it out. Note that while all supported instruments are from Hewlett-Packard at this time, there is nothing preventing this script to be extended to other brands. Please consider contributing if you have a device from Tektronix, Advantest, NF, Anritsu, Rohde & Schwartz, Yokogawa, LeCroy... RequirementsThis scripts has minimal requirements:
Testing your PyVISA setupTo test your Pyvisa setup you can run the 'pyvisa-info' utility. This will return the list of backends (py, ivi, ...) as well as the supported interfaces (USB. TCPIP, GPIB,...) Another test is to list the devices detected by PyVISA. This can be done in Python:
import pyvisa
pyvisa.ResourceManager('@py').list_resources()
where the backend '@py' can be changed if you have another backend available. This will produce a list like this:
('ASRL/dev/ttyS0::INSTR', 'GPIB0::1::INSTR', 'GPIB0::3::INSTR',
'GPIB0::6::INSTR', 'GPIB0::9::INSTR', 'GPIB0::10::INSTR',
'GPIB0::11::INSTR', 'GPIB0::12::INSTR', 'GPIB0::13::INSTR')
These identifier strings can be used for capturing a screenshot using the '-s' option. Note that the serial port on my machine (/dev/ttyS0) is reported as an instrument even if it is unconnected. Not sure why but at least now you know what string to use for your serial instruments. If an expected instrument is not listed then you may need to check your connections, cables, instrument power, PyVISA installation,... Final note regarding this command: on my machine I get a lot of warnings "libgpib: invalid descriptor". Don't worry about those, they are harmless and part of the device discovery process. Version history
Special thanks
ContributingFor developers, you can access the Sourceforge project page with GIT repository and subscribe to the mailing list. The main goal at the moment is to increase the number of supported devices. Please consider contributing by:
TODO and future ideasBesides adding support for more instruments this is also on the TODO list:
The tool hp2xx could be used to extract vector graphics from some devices instead of the raster images we are currently grabbing. More interesting discussions on the EEVblog forums and this page which captured vector plots over the serial interface. | |
| © 2024 Damien Douxchamps. All rights reserved. | |

