Improving the HP-53131A timebase calibration | |
|
Do you feel lucky? ... Well do you, punk? Despite it's 30 years old design and its often faded VFD display, the HP-53131A remains a very popular frequency counter from the golden age of HP (?): nice performance, tons of features, abysmal menus, more abysmal quartz reference and... great price at auctions for the hobbyist. My sample has all these traits, especially the faded display, with the exception of the crappy quartz timebase: it is fitted with option 001, an OCXO ('Oven Controlled Crystal Oscillator'). Although the worst performing of the three oscillator options, it is still miles ahead of the poor default quartz oscillator. Another bonus of having an OCXO option is the ability to auto-calibrate the oscillator: no more tweaking trimmers with the tongue at the right angle! Or so I thought... But one thing at a time. Having scored a piece of HP awesomeness called a 'modulation domain analyzer' (MDA, HP-53310A) I thought I'd take a closer look at the calibration procedure of the HP53131A. The Hewlett-Packard 53310A MDA is equipped with a better oven oscillator that I could use as a reference to calibrate the frequency counter. Plus, the calibration process could be recorded on the MDA to see exactly what's going on, and maybe improve the accuracy of the calibrated timebase in the counter. The HP-53131A counter auto-calibrates by adjusting a DC voltage that is fed in and compensates the oven oscillator in order to get a clean 10MHz output. The DC voltage comes from a XX bits D/A converter and thus has a limited number of discrete steps (4096??). This ultimately limits how accurate the auto-calibration can be. The problem is that the DC compensation works on a huge adjustment range, which makes our smallest frequency adjustment (the LSB of the D/A converter) a rather large 40mHz. That in turn means that the largest error we can get is about 20mHz. Could it be possible to get a calibration more accurate than that? It certainly seems so as can be seen in this and that video. Someone got lucky maybe? Actually yes, and let's see why... (Dave from EEVblog didn't get lucky because he used the mighty trimmer, which is actually a hint on what will happen here later on...) The auto-calibration procedure uses a rather brute force algorithm: a simple binary search going through the entire adjustment range. The MDA can help us see what frequencies are tested by the calibration algorithm and hatch a battle plan. Early in the search, the first tested frequencies show that the auto-calibration in the 53131a can deal with quite large oscillator variations, as the first steps are about 50Hz appart! The image below shows those first tested frequencies; note the large horizontal scale (50Hz). The binary search algorithm process is clearly visible and I have written in red the order in which each frequency is tested.  The binary search algorithm testing various frequencies (order in red) We can also zoom on the frequencies at the end of the calibration. The image below shows a histogram of the four frequencies tested by the binary search when closest to the target 'perfect 10MHz' which is indicated by the vertical marker line in the center of the histogram. The horizontal scale is here 200mHz, 250 times narrower than the previous screenshot. 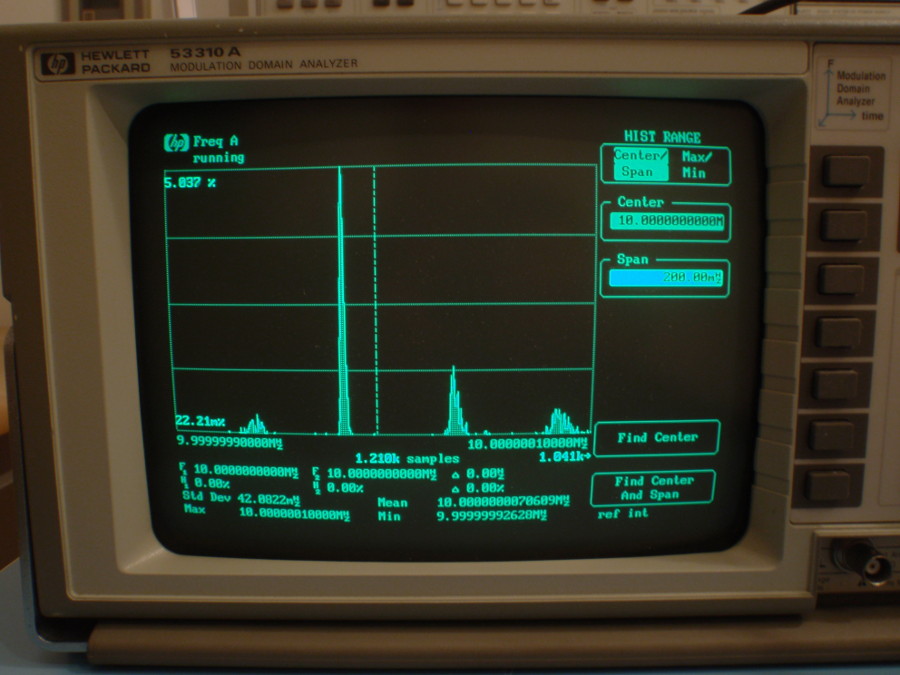 First calibration attempt I ran the calibration many times as sometimes suggested on the interweb, but the tested frequencies were always exactly the same. I suspect that the people who witnessed improvements by doing multiple tests simply did not let the oven oscillator stabilize long enough. In my case the repeatability of the calibration was perfect after 4 days of warmup for both the MDA and the counter oscillators. In the graph above the 4 closest frequencies are equally spaced (about 40mHz) and one can see that the highest peak on which the calibration procedure settled is indeed the closest to the true 10MHz value, but that there is also no way it's going to reach it unless another adjustment is made somewhere. This should immediately (?) give you an idea: what if we played with the adjustment trimmer that is on the OCXO board? Well my board does not have a trimmer but a large screw on the metallic casing of the OCXO looked promising and sure enough a trimmer was hiding behind it. Now here's where it gets interesting... See, the trimmer also has a wide adjustment range which makes it impossible to just use it to make the final adjustment after the calibration procedure. We're really talking less than 1 degree of rotations to barely hope to get it right. Not possible with a little screwdriver, even if you twist your tongue at the right angle. However... Do we really need to be very accurate with that trimmer? What if we touched the trimmer before the auto-calibration procedure? A-ha! Well in that case we don't care about the big offset we'll create: it will be compensated easily by the calibration procedure. But when doing that adjustment there is a good random chance that the mis-adjustment we've created will align with the frequency compensation of the auto-calibration algorithm! No guarantee of course, but after a few tries we should be able to get something closer. Nnnnnoice! Let's try! Now one important thing is that after touching the OCXO trimmer one should wait 'some time' (in my experience 30min) for it to stabilize nicely at its new frequency. Also, you should screw back the screw that protected the trimmer hole. This screw has an o-ring seal that prevents the pressure to change (too much) in the OCXO chamber and I recommend to re-set it firmly before letting the oven rest for those 30 minutes. Using the MDA we can visualize the how this calibration fared:  Second calibration attempt: oops... Ooops... It's worse! It's now actually in the worst possible position: equidistant from two calibration frequencies. But that doesn't matter, and it shows that the strategy can work: we just have to try again and feel lucky... After another trimmer wiggling and little pause to let the oscillator settle we observe this new histogram: 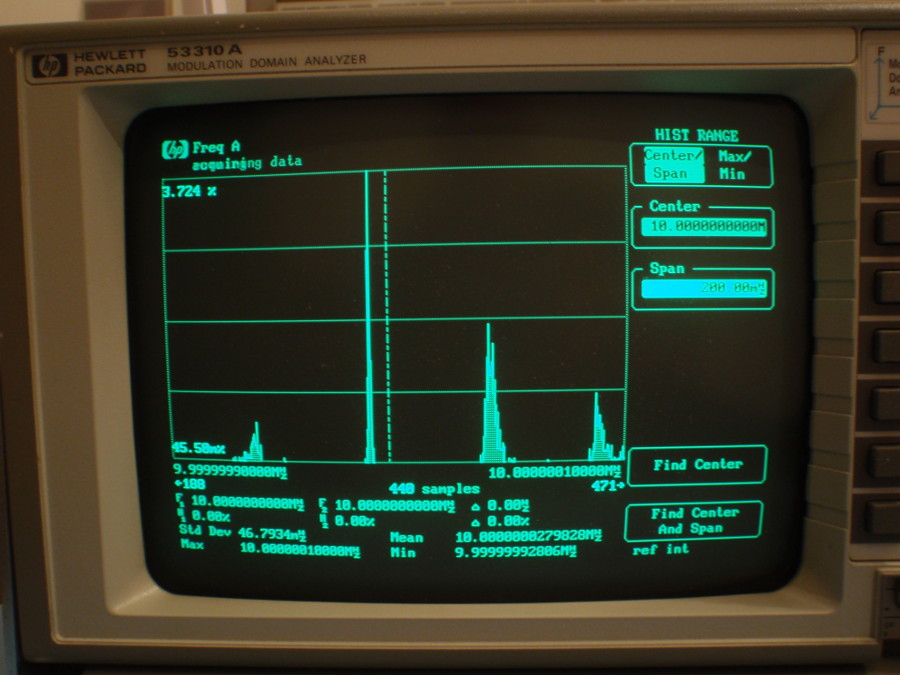 Third calibration attempt: getting there! 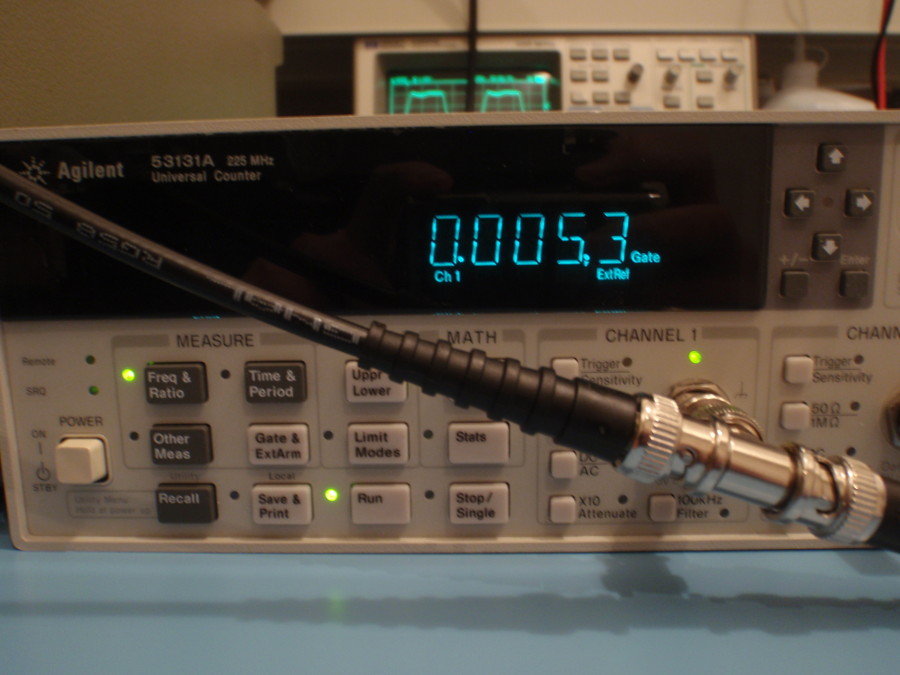 5mHz should be enough for everybody. This is much better... In fact, although I could still try a few times and hope it gets better, I'm going to stop here. I set the counter in offset mode (-10MHz) and in 11 digits accuracy and got a nice 5.3mHz of error! The frequency remains also nicely stable with a slight drift that brings it even closer to the 10MHz line after an hour or so, as seen in this last MDA histogram: 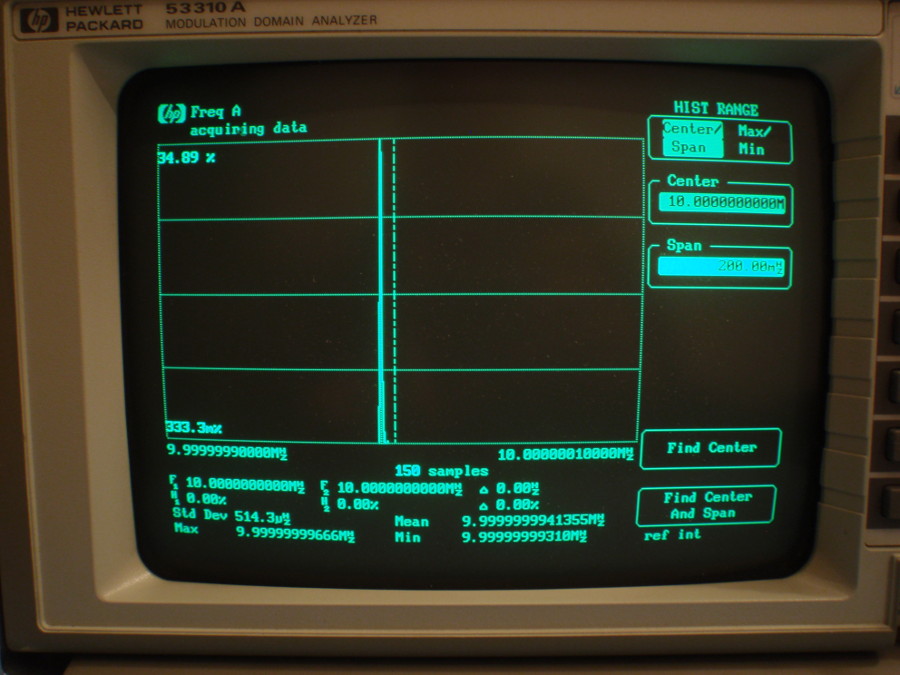 Third calibration attempt: getting there! The next morning the frequency was even closer with an error of only 1.49mHz. Trying to get anything more from that little OCXO is most likely overkill (which TBD this entire exercise already is a little...) So I'm going to end this with one last picture in its full potato-vision glory: 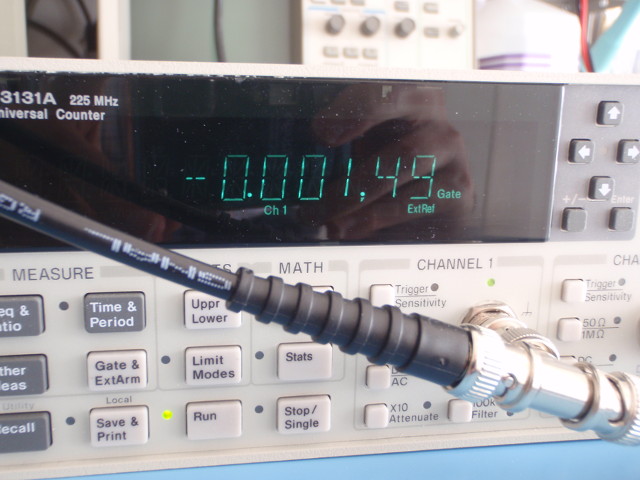 Sorry, I meant 1.5mHz should be enough for everybody So now you have a trick up your sleeve if you have a 53131A or 53132A and want to get a more accurate timebase than the onboard calibration algorithm provides. Just remember not to go full OCD on your precioussss micro-Hertz: the stability of the 53131's timebase may simply mask any improvement unless you have the top ultra-high stability option installed... | |
| © 2024 Damien Douxchamps. All rights reserved. | |

